The Draft Board, One Region at a Time
The 82-0 game board brings several jobs onto one screen. Here is what each region controls, what changes when you select a player, and where to look when the list seems wrong.
Find the control before choosing the action
These are functional regions, not a second playable board. On a narrow screen they may stack in a different order. Follow the labels: the reels define the draw, the list holds its candidates, and the jerseys show your roster.
Read the two reels together
TEAM names the franchise; ERA names the period. Together they identify the player pool for this draw. Looking at just the franchise leaves out half of the information, particularly when you remember a player from a different part of that team's history.
After a spin, read both labels again. The TEAM/ERA reference explains which condition changed. For deciding whether to spend a respin, use the separate TEAM and ERA guides.
Count the filled jerseys
PG, SG, SF, PF and C are five roster destinations. A filled jersey identifies a placed player; an empty one is a gap to investigate. With no draft booster armed, the selected card needs a free destination that matches its position labels.
A Trade changes that situation by allowing an eligible occupied destination. Read the active action before treating every highlight as an empty-slot pick. The board check covers ordinary placements and legal rearrangements.
The list is a view of the pool
| Control | Use it for | Read the result as |
|---|---|---|
| Name search | Finding a matching name inside the current draw | A narrowed list, not the entire game's player database |
| ALL and available G / F / C groups | Browsing everyone or a role group present in this pool | A role view; exact jersey eligibility still belongs to each card |
| Classic stat order | Ordering candidates by the chosen column | A lead in that column, not a verdict on all five stats |
A surprisingly short list is a reason to check the search text and role view. Clear those restrictions before judging the full draw. A changed TEAM/ERA context resets the search and role view and returns sorting to its default. Classic starts with the first published stat column; your previous custom order does not carry over to the new draw.
Classic shows the numeric line used for column comparisons. HoopIQ hides that line. Choose the visible-stat guide or the memory guide if the question is about how to evaluate players in that mode.
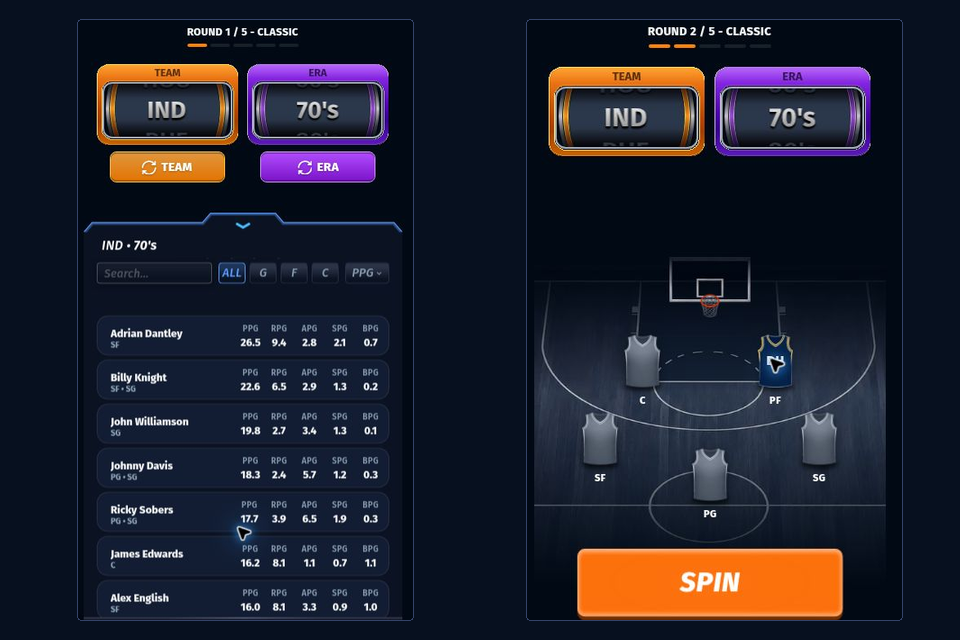
The current reels, roster and list tell different parts of the story. A crop of one player alone leaves out the draw and the available space.
What state is the board in?
For a normal pick with no booster armed, selecting the card starts the placement step; choosing an offered free jersey completes it. The highlighted destinations are the useful clue. You do not need to find an additional Confirm button.
- Browsing the pool
- No new candidate is active. Read cards, or inspect an existing jersey for a permitted rearrangement.
- A player is selected
- The board is asking for a destination for that player. Check the offered targets and whether a special action is active. Tap the selected pool card again to cancel that selection.
- A player is placed
- The roster has changed. Recount its gaps before evaluating the next candidate.
In the 82-0 game, a click makes more sense when you can name its job. Use the first-run walkthrough for the complete sequence; keep this page beside the game when you only need to locate a control or recognize a board state.
Use the interface map during your next draft: read the reels, check the list, then choose a destination.
Play on the homepage →